Showing posts with label patch. Show all posts

Digitizing An Image

After posting Chris's amazing tutorial for hand embroidered patches, I thought I'd share a bit about the process of machine embroidery - specifically digitizing a design.  If you've ever looked into having a design custom made you may have been shocked at what they charge just to digitize your design.  To keep things simple, I'm just going to work with a black & white design.  More colors = more difficult.


You want to reduce your color depth to the number of colors you're using.  The fabric can be one of those colors (i.e. white stitching on a black fabric).  After desaturating (removing the color) from my image, I turn the contrast to 100% so that there are no shades of grey left.  Just two colors: black and white.


But the problem is a lot of tiny speckles that my software would make a horrendous mess out of.  It can do a running stitch for an outline, but it can't manage a lot of dots - there would be a thread connecting them all in one giant mess.  So you need to clean up your design.  Connect areas of like color when possible (unless you know you'll need them stitched differently, i.e. separate directions).

After you import your design into the embroidery software it will automatically assign direction and stitch values that you'll probably want to modify.  It doesn't understand what the image is of, it's only evaluating the efficiency of the elements.  You will need to address each segment individually.  Sometimes an element may not translate from the image at all and you'll need to go back to the previous step and modify your design.


Above are two screenshots of how my software "sees" the image - the first is before editing.  Notice the crazy stitching around the left eye and some of the bizarre direction changes in his hair.  Changes in stitch direction will reflect light differently and be very apparent.  When in doubt, it's probably best to make everything go the same direction.

Then finally you're ready to export your design to the machine and test it out.  You may realize you need to make revisions, but the goal is to have most of those worked out before you waste time and materials.


New Patch Series

Over the past few weeks I've added new embroidered patches.  The Roxy patch was first - and it was actually a design I had played around with a few yeas ago when I first got my first embroidery machine.  The Riff was second - and it's kind of a combination to get the right effect.  The window shape and lightning bolt are screen grabs  from Over At The Frankenstein Place, but Riff's face is actually pulled from the door scene (wasn't sharp enough in OTFP).  Frank was hard.  I really wanted a Frank design, but a lot of the images just weren't translating well for me (his hair was often a problem).  Sometime after Halloween I'll try to get more characters represented. I'm also working on a custom design for a cast, and if that turns out well might be something I can offer other casts.

Ron Maxwell Approved!

Designed by Dana S. and embroidered by yours truly. You know that mystery patch on the back of Frank's jacket? This is probably what it was! Or at least, what it should be. These will be available this weekend at the 4711 convention in Atlantic City!

Bradwinkle Patch

Jenny has been one of my biggest supporters over the past decade, but I've never had the chance to meet her. There are so many people I'm looking forward to meeting at the 4.7.11 con next month, and Jenny has to be there! When Liz Beaux posted on her LJ that she was going to make this happen I offered to help, too! 70% of the sales of this patch will go to help fund Jenny's 4.7.11 trip. Visit the "in stock" page of my website to orders your!

Eagle (Nazi) Patches on Frank's Jacket

This is my replica of the Nazi patch on Frank's left sleeve, minus the swastika. The embroidered area is about 4" across. I used a metallic gold thread because most extant examples I've found online were metallic, despite Frank's looking dingy and matte (it would have been at least 30 years old during filming).

The Eagle on the bottom of his Right sleeve may have been metallic silver. The example I found online says it's embroidered in silver even though it still looks like a dingy white (below).  I've been using white and I've replaced the swastika with a skull, as there are examples of this design with a skull directly below the Swastika.

It's likely the skull & crossbones patch on his right sleeve is also of Nazi origin.


Nazi Eagle design with skull
Original Nazi Luftwaffe patch,
silver thread on black felt.


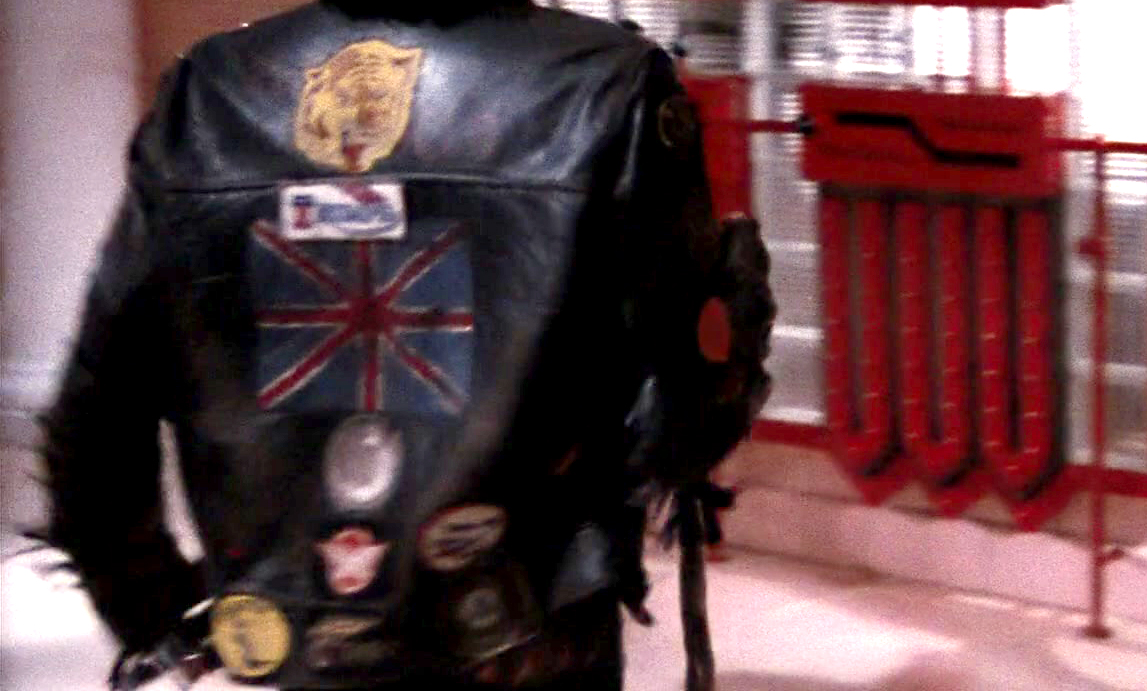
Frank's Leather Jacket (Research)

These screen caps show off quite a few patches. I replicate many of these patches for sale. I offer a non-swastika version of the eagle on his left sleeve (contact me for purchase).

This jacket style has been reproduced by the original manufacturer - Lewis Leathers - they are known for their red quilted lining.  Look for the Plainsman, Style #393.  The fringe will need to be removed from the front and back (as Frank''s was).

I have detailed the list of patches below (to the best of my knowledge, though I always welcome additional info).  As for the mystery patch below the flag. I personally believe this is where a patch used to be and either left behind a residue or damaged the leather. If you study the Mick Rock photos, you can tell several of the patches are partially peeling off the sleeves. With the detail of the BluRay on a 4k screen there is still only a blurry smudge of a design when you can clearly see the adjacent patches in clear detail.


Patch: Royal Enfield
Placement: Top of left sleeve
Details: Red and metallic gold. Black border.

Patch: 59
Placement: 2nd from top of left sleeve
Details: Frank's looks silk-screened to me. You can buy an embroidered 59 patch for £5 if you join the 59 club (membership is £18/year).  

Patch: Tri-BSA
Placement: 3rd from top of left sleeve
Details: Metallic gold, royal blue embroidery on black rectangle.

Patch: Triton
Placement: 4th from top of left sleeve
Details: Metallic gold thread, black felt circle

picture

Patch: Honda
Placement: 2nd from bottom of left sleeve
Details

Rock N Roll Patches In Stock!

I had these screen printed, and then they are edged in gold and trimmed with pinking sheers. They are a little more than 4" x 4" and they can be glued or stitched on. Limited qty. but if there is an interest I will have more made. Just click on the "For Sale" tab at the top of my webpage to purchase.

TriBSA Patch

Latest addition to the patch family - the gold thread is metallic, though the camera flash kind of flattens the effect. It's 4" x 3" on black felt. I have a few for sale and ready to ship - just click on the link at the top of the page!

Tiger Patch for Frank Jacket

This is my final version of the Tiger patch embroidered on felt (100% polyester). It measures 5½" across by 5" vertical. The Triumph patch below the Tiger is still easy to find. The "Royal Enfield" lettering behind the tiger is just acrylic craft paint. The Union Jack flag is actually an iron-on that I printed off my computer.

I think the Tiger is probably related to Triumph motorcycles - who had a series of Tiger model bikes. I've seen similar Triumph designs that incorporate the Tiger over the Union Jack flag.

There are a couple quick opportunities to catch this patch in the film.