Showing posts with label magenta. Show all posts

Meet Fuchsia... Magenta's sister

Personal project of mine to attend The Rocky Horror Show in the UK on the new tour starring Jason Donovan as Frank. Last year for the 50th anniversary I replicated Little Nell's 1973 costume, though I failed to get the response I was hoping for. I was later informed that because I attended the show on a weeknight I missed most of the hardcore (fan club) fans.

So this year I aimed to do better. I needed something more recognizable, but still a bit unique. I came across Mark's gorgeous space suit creations and felt inspired to go pink (I mean, have you seen my hair??)

Although I'm still nursing a toe injury from June and couldn't wear my pointy-toe stiletto boots, I found a round-toed option by the same manufacturer that was tolerable to wear. The wig was from my usherette costume, though I dyed it a tad darker. 

I was so excited that the Space Suits who inspired mine were actually there - along with so many other people in amazing costumes. My wings were actually just left-over prototypes - one was made with 3mm foam and the other side with 4mm foam. No big deal, I don't think anyone could tell. The buckle was 3D printed by my husband. First I sprayed the vertical bits hot pink, then I over-sprayed them with a darker (almost purplish) glitter spray to get it to match the tabard. 


Space Suit Buckle

Although I realize the back of the buckle is stitched vinyl like the belt I wanted to create something a little more functional for quick changes. My husband 3D printed this buckle with a pass-through for the belt in back (someone has a similar version on Thingiverse, too).  Click here for more info and pricing on my Space Suit and its components. 


Space Suit Tabards (Research)

Todd D. emailed me this amazing rehearsal shot of the space suits sans wings! 


Space Suit Experiment

I've been dying to experiment with both this fabric (gold spandex) and my longarm (quilting) machine. I'm using some Warm & Natural batting I had on hand and a black Kona cotton backing. I stitched 1¼" squares with a 1½" unquilted border.

I updated my spacesuit pattern and it's available for free to download from my Google drive (below). If you print it on large format at Kinko's or Office Depot make sure it prints 100% to scale. If you need to resize it larger you can simply scale the whole pattern up, or you may need to modify the quilting to keep the squares the same size.

Space Suit Front 
Space Suit Back

Here's the materials I used for one tabard (of course coupon discounts and tax rates will vary):

My tabard pattern (~$7 for large format printing)
1 yd Metallic Foil Gold Spandex ($7.99/yd + tax & shipping = $17.16)
1 pkg Warm & Natural batting 45" x 60" ($19.99 + tax = $21.63)
3 pkg Wright's 7/8" Single fold bias tape ($3.99/ea + tax = $12.96)
6 1-1/8 Fabric covered button kit ($6.99/pkg + tax = $7.56)
2 yd Black Kona Cotton backing ($9.99/yd + tax = $21.63)
Large snaps (for neck opening and tabs)

= $87.94

You can see why it's not really feasible for me to make/sell these when it costs over $80 just to make the tabard without the belt and wings. There's not much room left for cost of labor.

I'm hoping to make separate blog posts for the belt and wings...


Magenta's Boots

Magenta wears her stiletto boots up until the Takeover scene. The scalloped button edge is very Victorian-esque, though the stiletto heel definitely is not. They appear to be brushed satin, and there are 7 working buttons (notice her left boot is unbuttoned in Touch-a). Some years back Betsey Johnson released a very similar homage; though it's suede, has 6 faux buttons, and a zipper for easy wearing. They still turn up on sites like eBay and Poshmark regularly - search for "Betsey Johnson Wing It" boots.

From Mick Rock's book
My Betsey Johnson "Wing It" boots

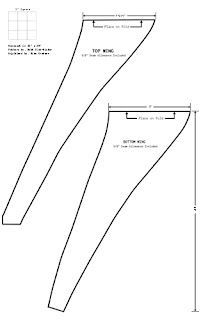
Space Suit Wings by Ruth

Years ago Ruth sent me a draft of her space suit wings. I finally got around to getting them uploaded and digitized on my computer. I recommend making a test pair out of paper or something so you can adjust the size accordingly. 

As for materials and maintaining the stiff wing shape, I leave that up to you to explore. Some people have used 1/2" sheets of upholstery foam with wire on the edges to shape. I've tried stiff interfacings and milliner's buckram with mixed results (once they get dented or bent they don't recover). I've even made 'disposable' wings with black garbage bags and cardboard and 1/8" craft foam, and just replaced them after several uses. 

A 5/8" seam allowance has already been added to both sides of the pattern. All you need to do is place the top end on the fold of your materials. Basically, your wings will look like a boomerang when laying flat. 


Click to download full size (22" x 35")

Space Suit Quilting

This is my best estimate at the quilted pattern on the space suits.  Riff & Magenta's seem identical.  The red lines indicate where the space wings and belt cross (and partially obstruct) the pattern.

This scale works well with the quilted gold lamé sold by Hancock's (sadly, they went out of business in 2016), though you'll need to make custom adjustments for larger sizes.


There is something hard to discern on the lower back.  A kind of shaping, maybe?  The best I've been able to address it is to create a separate piece of quilting and overlay it.  You can view my research in this blog post.


Magenta's Magazine

After spending a ridiculous amount of time tracking down Columbia's magazine, I was able to find Magenta's in much shorter order. It's Movie Mirror from April 1961.  I had the cover reproduced on a stiff, glossy cardstock, and as a prop it will last longer that way. You can do a single bend down the spine, or a double bend depending on what magazine you want to re-cover. I used an Opera News magazine - it's size is slightly uncommon (16.5" x 11"). I used the edge of my kitchen counter to get a crisp fold (measure against your magazine, not the page's design.)

I'll have these for sale at upcoming conventions.

Lab Masks (Research)

I've never come across actual surgical masks that look like this (anyone?) but they seem stretchy or kind of rubbery.  In the past I've experimented with sheets of latex, but you have to mix the right color medium, etc.   Kind of a pain.  You can buy pinky-flesh colored vinyl fabric that works nearly as well.  The only downside is that your lipstick will get on the backside and depending on the brand, may not come out.

They are cut straight across the top, but are rounded (pointed?) below the chin.  You can download my free pattern and give it a try.  I like the PVC vinyl with two-way stretch, but felt also works great.

Spiked Anklets (research)

Spurred by a conversation on FB, I remembered I had looked at this before and even bought the supplies to make one.  Riff and Magenta both wear a single, spiked gold anklet on their left ankle during the take-over scene.  It's not very easy to see in the film (maybe easier on the BluRay), but there is a great shot in the Mick Rock book (p. 257, though the photo is reversed).

They are probably about 3" wide, and pretty snug fitting.  There are 3 rows of metal spikes (1/2" or longer?) in a staggered array.  The leather base (or whatever) is edge-stitched

You could use vinyl, but you'll probably want to back it with something more substantial to support the weight of the spikes.

Magenta Dress Pleats

You can easily incorporate pleats to any commercial shirt-dress pattern of your choice.  Draw three parallel lines directly on the pattern about an inch apart - I'd probably put the first line about 1¾" from the pattern's center front. 

Cut on the 3 lines you drew on your pattern and lay the pieces out carefully with about 5/8" gaps between the pieces.  Use the pattern's waist line to keep them lined up evenly because the shoulder and neck lines will appear uneven.  I recommend taping down the pieces once you have them arranged.  With a tracing wheel and transfer paper, mark the center of each gap from shoulder to hem.  This will be the line you fold your fabric on to stitch down your pleats.  Sew your pleats just over ¼", then press (away from center front).

I finish my edges with single fold bias tape.  I tuck the loops into the edge about 2" apart.  The buttons are sewn closer to the pleats than the edge.

Magenta's Dinner Sheer (Research)

There is definitely a seam going across the middle of the back - and it looks to me like it continues all the way around to the front as though the entire top of the dress is a separate piece.  There is also a seam from the armpit to the waist seam.   I cannot determine if there is a seam across the shoulder, but it wouldn't be necessary since there is already a seam under the arm.  I also don't think there are any ties - probably some sort of hook & eye sewn into the waist seam (where it would have strength) or perhaps small snaps.  In the second photo, it even looks like there could be a black button there?  I just can't tell.

The front edge and hem do not look they have been hemmed or edged in any way, except for the sequins that begin somewhere behind the neck, come down the left side and around the hem for a bit.


I have tried extensively to create this in one continuous piece of fabric - but the visual (and logistical) evidence doesn't support it. Using two pieces of fabric, this is my best guess.  And you can probably make it out of one square meter of fabric - just put the long seams on the bias.


Boot Toppers (Revised)

I've revised my previous method for modifying a pair of space boots - still using the same fabrics (black PVC vinyl and silver stretch lamé) but also sandwiching a layer of heavy buckram in between with spray glue.  Then I cut my pattern out of all three layers and edge-stitch (about 1/8") along the zig-zagged side only.  I then peeled back the PVC and lamé to trim the buckram out of the base.

I attached the PVC to the outside of the boot first with e6000 glue.  Clothespins or hair clips will work great to keep things in place while drying. 


Once the PVC is secure on the outside I glue the  lamé to the inside of the boot.  Because the inside circumference is a little smaller, it might have a couple wrinkles.

Finally I roll the points down and secure them with clips for a couple minutes.  When they come out, the petals will retain a nice curve without the aid of a wire.


My pattern has also been revised with longer petals.  You can download the new Boot Topper.pdf from here.

Modifying Space Boots

I have revised my space boot method - please visit my new blog entry here: http://columbiascloset.blogspot.com/2011/05/boot-toppers-revised.html

I can usually find a good base for about $40 on eBay.  Ideally you want a black patent leather ankle boot with stiletto heels that has a center seam running all the way down the middle.  But if you can't find that, aim for something with a pointed toe and a straight top.

I made my points out of 2-way stretch black vinyl and silver spandex - the forgiveness of the stretch is what will make them easy to work with. After you've sewn the black and silver points together and clipped the points and turns, you can turn it right-side-out and you'll probably want to steam them flat (with a pressing cloth!).  

Now you're ready to attach the topper to the boots.  With e6000 (or your epoxy of choice) apply the wrong  (inside) of the vinyl to the outside of the boot.  Yes, there will be a seam, but it's not going to be noticeable.  Do not secure the silver fabric yet.  Go slow - I recommend only securing a couple inches at a time and waiting for it to dry before you proceed.


Then I took some 16 gauge craft wire and bent it into the same zig-zag shape (but rounded the cut ends so they wouldn't poke through).  I put a dab of e6000 at the top of each 'point' before inserting them inside the fabric.

When the points are secured, you can begin gluing the silver fabric to the inside of the boot.  Careful not to obstruct the zipper.  Once it's set, you can bend the 'leaves' accordingly. 

I've added my zig-zag pattern to the Pattern Page, and you can see the finished boots in my original Space Boot entry.

Space Suit Lower Back (detail)

I can't tell exactly what is going on the back of the space suits - you only get a couple seconds to see it when Riff approaches Dr. Scott. But it definitely looks dimensional and somewhat separate. So I created the piece and lined it separately before sewing it by hand onto the back. The top side is left open (like a pocket), but the other edges follow the grid.


Space Belt Buckle.jpg

Mitered wood dowels covered with several layers of fiberglass for a solid, hard shine. Buckle is backed with a cotton lining and strips of velcro and the belting is covered with a layer of clear vinyl that hangs over 1/4" past both edges (very hard to see in this photo) and has rows of metallic gold stitching. The dowels are 5" tall, and the buckle is 5-3/4" wide.

In the second photo showing the back with the velcro strips, you can also see the clear vinyl easier - and the belt is just tucked under a strip of velcro before being stitched down.

When stitching the metallic gold thread onto the vinyl you'll need a teflon foot.  The thread will break occasionally, but I had the best results when maintaining a very slow and consistent speed - no jerky starts and stops along the way.

Space Belt Dowels

I tried so many other materials for the mitered half-round dowels (including foam rods and hair rollers), but ended up using wood. My husband cut them because when I tried to cut them on the miter saw it made a lot of smoke and now I'm not allowed to use it. I coated them with 3 layers of fiberglass mixed with 2 shades of gold and a sprinkle of silver Jacquard medium. They clink now and feel nothing like wood. All I have left to do is make the piece they attach to - like the belting but wider.

Magenta's Peignoir

I used a vintage peignoir pattern and only modified the neckline. The shoulders are fitted, but the rest of the sleeve is loose. It's about knee-length. The marabou was tea-stained to get the tan color - you could also use peach dye if you prefer a pinker tone. Chiffon ribbon is pleated into the neckline, and it closes with a snap.

Fiberglass Lightning Bolt

My awesome friend Alex has been teaching me how to work with fiberglass. I used this method to make an oversized belt buckle on a pirate costume, and about 30 seconds later realized I could apply it to some Rocky costumes. I can't wait to attempt the space suit buckle out of it.

The materials are pretty easy to come by - but the smell is vile. Worse than walking into an acrylic nail salon. You should probably wear a mask, protective gloves and eyewear. And you should probably do this outside or someplace well ventilated. The fiberglass resin is from the hardware store - and it comes with a tube of hardener. By itself, the resin will never harden.

I also added some pearl black jacquard pigment from the art supply store - you should see some of the metallic colors it comes in! Anyhow, you mix that right in with the resin. Once you add the hardener you have maybe 10 minutes to work with it. Sponge brushes are ideal, but a soft brush will work, too. For the most part, the mixture is self-leveling.

I applied it onto pre-cut shapes of 1/8" foam from the craft store (a.k.a. "Foamies"). I actually used the foam with an adhesive backing so the bolt would stay flat during the process - the fiberglass has a tendency to make the foam shape curl. It was dry to the touch in about an hour and then I did a second coat. I did the same on the back side and stuck a pin-back into the wet fiberglass.

Magenta's Dress Pleats (Research)


Because details are so hard to see on black, there aren't many places in the film where you can really see Magenta's pleats. There are 3 on her sleeve that appear to end before the shoulder seam, and 3 down each side of the front.

You can also see that her white collar isn't completely attached in front.
Also notice that her sleeve stops right above the elbow; longer than your average "short sleeve" dress.